Bridges and Implants
Southlake, TX

Patient 1
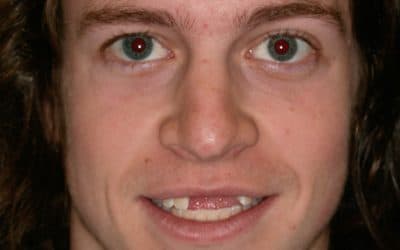
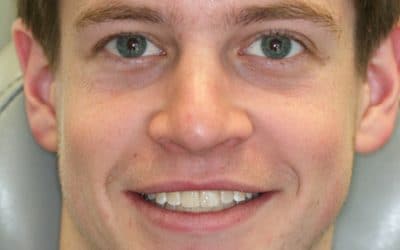
Treatment: Replacement of a anterior bridge replacing the patient left front tooth. New porcelain crowns for his canines. Minor tissue re-contouring. Level lower anteriors. This gentleman came to our office with the intent of replacing his worn anterior bridge. The teeth were worn and chipped and there were a couple of different shades. So we elected to bleach his teeth to lighten the shade, and then to replace his bridge. Our patient was not interested in replacing the missing tooth with a single implant. So we removed his old bridge and fabricated a new one. Not quite as simple as that sounds, but if you use the right ceramist and are blessed with great patients, it really is more like fun than work. Our patient had great soft tissue so we were able to make the false tooth portion of the bridge emerge from his gum tissue just like a natural tooth. Over all a very well done case. One that he and I both are proud of.

Before
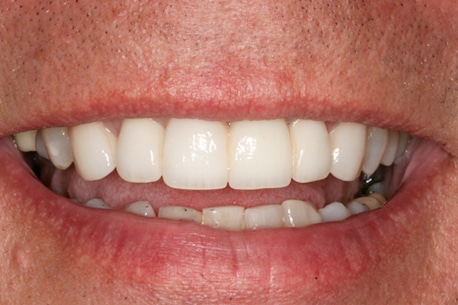
After
Before
After
Patient 2
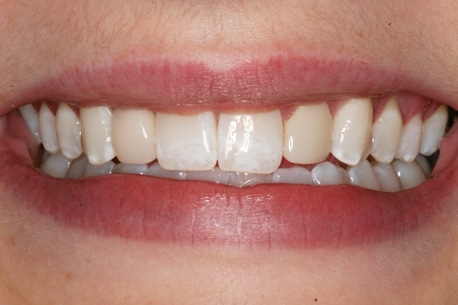
Treatment: Replace two three unit anterior bridges with two dental implants and single crowns. This patient came to us several years ago with two very well done bridges replacing her maxillary lateral incisors, which she had been born without. Replacing these missing teeth with bridges was the best option that was available when she had them done, and they were well done, so we left them. Over time, the bridges began to wear and needed to be replaced. The porcelain broke on one of them, forcing the issue. She wanted to get rid of the bridges and explore replacing the missing teeth with dental implants. Dr. David Hunter placed the implants, and with the help of our master ceramists, we were able to restore and replace the missing teeth in a way that you would never know she had anything but great teeth. And they are single teeth, so flossing is normal, etc. This was a great team effort! — Dr. W

Before

After
Patient 3
Treatment: Dental Implant and Crown Right Lateral Incisor, Crown Left Lateral Incisor. Zoom Bleaching In this patient’s before photo you see her in a temporary crown on her implant that replaces her right lateral incisor, and with a temporary crown on her left lateral incisor. She had been born without the right lateral, and the left was misshapen, kind of a tapered peg shape. A dental implant has been placed, she bleached and we are able to carry on with her permanent crowns. Making a single crown surrounded by natural teeth invisible is the most difficult that we have to do in cosmetic dentistry. Then if you add in the fact that it is an implant and not a crown on a natural tooth, and that she has a specific unique mottled look to her teeth, it makes it almost impossible. But I did say almost. If you are fortunate enough to work with passionate ceramists, who have the same credentials as I, then things such as this can be incredibly rewarding. We gave her front tooth back! How fun is that! She was also one of my cases for my Fellowship with the American Academy of Cosmetic Dentistry. Thanks for letting us take care of you! — Dr. W.
Before

After
Patient 4
Treatment: Bone and Soft Tissue Grafting, Dental Implants, Zoom Bleaching, and an Implant Supported Bridge with Custom Abutments, a Single Implant and Crown. It has been my privilege to know and take care of this patient since he was 2 years old. You can imagine how disturbing it was to get a phone call and learn that he had crashed on a snowboard and knocked out his front teeth. He initially saw a dentist in Colorado who temporized the situation until he could get home. In a situation like this, when there is bone damage and grafting needed, I am fortunate to have great periodontists and oral surgeons to call upon. In this case we worked with Dr. Wm. Grover in Grapevine for the grafting and implant placement, and ultimately we were able to get our patient taken care of. Socially, I think you would be hard pressed to know that anything ever happened. He now wears an athletic mouth guard when snowboarding, I hope. –Dr. W

Before

After
Before
After